
Temperature Project Tutorial
Description
What is a “Temperature” Project?
-

My 2017 Sea Star Temperature Blanket
-

Example Temperature Gauge
-

My 2016 Temperature Blanket

A temperature blanket (or project) shows colors that represents different temperatures for the location where you are or where you live. They have a lot of room for various patterns, colors, designs, and interpretation. Just because I give some instructions here, doesn’t mean that you are limited to those. Think big, think outside the box. But the fun of the Temperature Blanket is that it represents you and your year.
You can also choose to do one for someone else, or one that represents an historical time period. For example: the first year in your child’s life, first year of marriage, etc.
Supplies
Supplies
You will need:
- A pattern/stitch that is “low profile” – meaning stitches that are not tall, e.g., moss, linen, or single crochet or patterns that are based on them.
- OR a pattern for small motifs that can be sewn together (see pattern gallery or layouts).
- Crochet hook that is on the smaller side to keep your project’s size in check (too big may mean a HUGE blanket).
- Yarn in various colors that are put in order to make “temperature” sense (see temperature palettes).
- A place to record temperatures, e.g., Excel or Google spread sheet, a journal or notebook, or a calendar. For conditional formating instructions for Excel, click here.
- A method of handling your ends…especially if you choose to make your blanket in rows – sew them in or use them to make fringe.
The Pattern
The Pattern

2017 Temperature Blanket through June 23rd
The pattern you use is important because your goal is to represent the temperatures over the course of a year. That is a lot – 365 days worth (or 366 during leap years)! There are several options you have open to you to to make this your own, and there is no wrong or right pattern to use. The biggest consideration is the pattern. You want to pick a pattern that won’t end up super huge when you have to crochet 365 rows! This is the most common mistake that people make in taking on a temperature blanket (I did this also!!). You can, instead, make small motifs. Motifs are easier to control for size, but patterns done in rows show a progression of seasonal temperatures.
For afghans worked in rows, it is best to choose a single crochet variant – so, a pattern based on single crochet. Many people do a single crochet (regular, or in back loops), but one of the most popular choices is moss/linen/granite stitch. Ripple patterns that are single crochet work well also. But there are creative ways to work around this, like doing a number of stitches per day, rather than a row per day. See my post on the Ellipse pattern or even the pattern by Janie Crowfoot, Persian tiles, adapted for a temperature project. Both are creative and different.
For afghans worked in motifs, you need to make sure that the measurement width and length make sense and won’t be too large. The good part about motifs is that you could include both low and high temperatures OR low. high, and average temperatures. Motifs can be adapted also to use one weekly square or one monthly square that you can sew together to include the whole year.
Corner to Corner (c2c) also work well. I have seen them done one row per day or so many “boxes” a day. See the post on the Corner to Corner pattern for more information.
Patterns worked in the round (like a motif, but one piece) can be done with so many stitches used for a day. So, if you make an endless granny square, you can do 24 double crochets a day (or 24 groups) and just continue working in the round. So, January would be in the middle and December 31st would be your last round.
One consideration is what to do with your ends because you are likely to have a lot of them if you are working in rows. You can:
- Use the ends as fringe
- Weave them in
- Crochet over them
- Learn a yarn joining method
Temperature Gauge
The Temperature Gauge
There is also no right way to arrange your temperature gauge, and it should be tailored to your location. For example, I live in southern California. There is really no point for my temperature schedule to go much below 50° for high temperatures, or 30s for low temperatures. So, I don’t need to divide up the lower temperatures in my gauge. You can choose to have wide bands of color with 10° increments. This means you don’t need as many different colors. OR you could choose to do a 3° increment gauge with lots of colors. This is totally up to you. For my first blanket, I choose to do a 3° degree increment gauge. The good things is lots of colors, the bad things is lots of yarn colors, and I might end up with colors not as gradually colored, especially with larger temperature shifts. This can be viewed as good or bad. Again, this is all dependent on what YOU prefer.
Here is the gauge I used for my 2017 blanket

2017 Temperature Blanket through the beginning of October

This is the gauge I used for creating my sea star temperature blanket. I did not do highs and lows. Instead, I just made a two temperature chart. Each temperature range used a two color combination.
 Colors
The colors are also totally up to you. The gauge on the left shows a rainbow of colors. White you don’t have to use the full spectrum, I do recommend that you based your gauge on universal interpretations of warm and cool colors. This way, your temperature blanket makes the most sense visually. Warm colors are variants of reds, oranges, and yellows; while cool colors are greens, blues and purples. The weather stations typically use these same colors on weather maps – so it is fairly universal. However, you can choose to use only parts of the spectrum if you want, or to include white, black, or grey.
There are several other examples below.
 Of course, all of this depends on what yarn you have available, how many colors you want to use, and if you can find the colors that work. If you want to keep it simple, go to your local yarn store, find some colors that you like, put them in an order that makes sense, use a chart that fits your local area, use some scratch paper or a computer to figure out a spread of temperatures that makes sense and assign a color for each range.
So, on the first example, these were Caron Simply Soft yarns I already had and could use. On the second example (the teal, white, and coral), this is a conceptual idea, but I don’t know if I can find the right color yarns to accomplish this.
Remember, this is a random project – it will not look quite this organized in your real project!
Also, if you decide to use both high and low temperatures for your project, you need to make sure your gauge covers the lowest and the highest temperatures. In southern California, I don’t see much below 40° at night, but did include a few levels below, just in case I went somewhere. Yes, I did the temperatures for where I was. When I went on a trip to Alaska, I used those temperatures instead of my home location. This is up to you.
There are many other example temperature gauges you can peruse if you click on the menu at the side.
Recording Tool
Recording Tool
I use an Excel spreadsheet to record my data. There is a way to use “Conditional Formatting” to make the cells change color, depending on what number is entered. Download my How to Create Conditional Formatting in Excel Tutorial which explains how to do this. You don’t have to use Excel of course, you can also use just a pad of paper or Word, etc. I like to use Excel and put it in my Dropbox or Google Docs folder so that I can have access to it anywhere on my cell phone.
I have some tutorials and examples of Excel conditional formating available as well. This is a pdf document with written instructions on how to create a file.
Weather Resources
Online Weather Websites and Data
You will want access to temperature data. You can get this data from the news or newspaper, but online sources are the most useful. If you don’t want a lot of details about using online information, go ahead and skip to the next section. Many of the online sites offer a way to look up data from previous dates. I use Weather Underground and even purchased a personal weather station and installed it at my house. Here is the reading for my weather station:

Notice that it gives yesterday’s temperature – the high and the low. For average, you need to click on “History” and it will tell you more data.
If you want to look up the history that goes farther back – or to get information for a previous year, you need to go into “History” and “Custom” to enter the dates. That page looks like this:

The one thing about doing the history temperatures, is that it is not likely that you will have temperatures for RIGHT by your house. The only place that often has a wide range of past temperatures are at official recording sites – typically airports.
Another point I should make is that personal weather stations can go out (batteries, etc.) and may not always have the data or be available. If you want to use a specific station near you, you can click on “Change Station” and choose one. Here is an example from Hoonah, Alaska:

Clicking on Change Station will take you to this page, where you can choose another station.

Customization
Customization
There are many ways to customize your temperature blanket to make it your own. Here are some ideas that I know that some people have used:
- Using a special, sparkly thread held with the temperature color yarn to mark special days (birthdays, anniversaries, etc)
- Using colors to signify weather conditions along with the temperature colors (usually used as a border or some other way for motif patterns)
- Using a color for the month’s gemstone for the center or border of a motif pattern blanket
- Don’t make a blanket….make a scarf, a temperature animal, a tapestry, a garland, etc
- Don’t do a whole year, do a season or make two half-year blankets
- Do every other day to control for size
- Do a certain number of stitches instead of a row a day or a motif a day
- Do weekly or monthly squares instead of one a day
- Do a ripple blanket in the back loops where one side is the high temperature, and the other side is the low temperature – of course, this makes double the length, so maybe this works better for a 6-month blanket
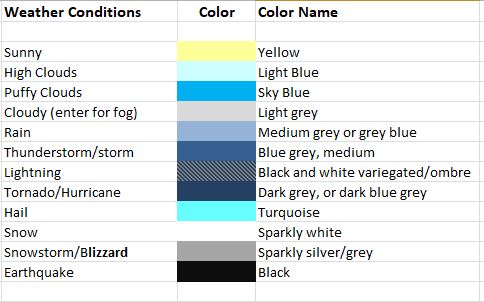
- Instead of temperatures, do a weather conditions blanket – sunny, partly cloudy, cloudy, raining, snow, etc. Or, maybe you want to incorporate the “dew point”.
- Heck! Don’t use temperatures at all – use your baseball teams winning and loosing game count. Use a color for at home wins, at home losses, away wins, and away losses. (I took this idea from someone’s post in a Facebook Group.)
Here is another possibility for a gauge that doesn’t involve temperature:

My Projects
My 2016 Temperature Blanket
Here is my 2016 blanket. I used a Ribbon pattern and had a 3° temperature chart. The photos shows it not completed. The thing I learned from this first time experience is the lesson about short vs. tall stitches. This pattern has both single crochet and double crochet. Even though I did a test swatch, it still is longer than I anticipated. If I were to do this pattern again, I would try it with single and half double crochet OR slip stitch and half double. Here is a link to the pattern.

My 2017 Temperature Blanket
I LOVE this version so much more than the 2016 model!! Was much easier to keep up and I sewed together as I went.

Resources
Resources
More coming soon for 2020!
- BewitchingStitch-16x23-TempGridLeap.pdf (113706 downloads )
- BewitchingStitch-16x23-TempGridNoLeap.pdf (112997 downloads )
- BewitchingStitch-18x23-TempGridLeap.pdf (165195 downloads )
- BewitchingStitch-18x23-TempGridNoLeap.pdf (163888 downloads )
- BewitchingStitch-WeeklySquareGrid.pdf (151289 downloads )
- BewitchingStitch-3-day-block-TempBlanketGrid.pdf (112802 downloads )
- BewitchingStitch-5-day-block-TempBlanketGrid.pdf (3213 downloads )
- BewitchingStitch-MonthlyStrip.pdf (3597 downloads )
- 2018TemperatureChart1.xlsx (84377 downloads )
- 2018TemperatureChart-Celsius-1.xlsx (113581 downloads )
- BewitchingStitch-CondFormatTutorial.pdf (153204 downloads )
Feel free to contact me with any questions.
You must be logged in to post a comment.